
Applying makeup with a sponge can turn an ordinary routine into a flawless, airbrushed finish. Many people struggle with streaks, uneven blending, or patchy coverage when using brushes or their fingers. But when you learn how to use a sponge correctly, makeup goes on smoother, looks more natural, and lasts longer.
If you want your foundation to look like your real skin, the right sponge technique makes all the difference. In this guide, you’ll discover every step, from choosing the best sponge to advanced blending tips, so you can master this essential beauty skill.
Why Use A Makeup Sponge?
Makeup sponges have become very popular because they give a seamless finish. Unlike brushes, sponges press foundation and concealer into the skin, which reduces the appearance of pores and lines. A damp sponge can also prevent product buildup and caking—common problems with brushes or fingers.
Some benefits of using a sponge:
- Natural look: Sponges blend makeup more evenly.
- Buildable coverage: You control how much product to apply.
- Versatile: Useful for liquid, cream, and even powder products.
Beginners often miss that the sponge needs to be damp, not dry, for best results. Also, tapping (not dragging) is the key to a flawless blend.
Choosing The Right Makeup Sponge
The market is full of different makeup sponges. Picking the right one is important for your skin type and desired look.
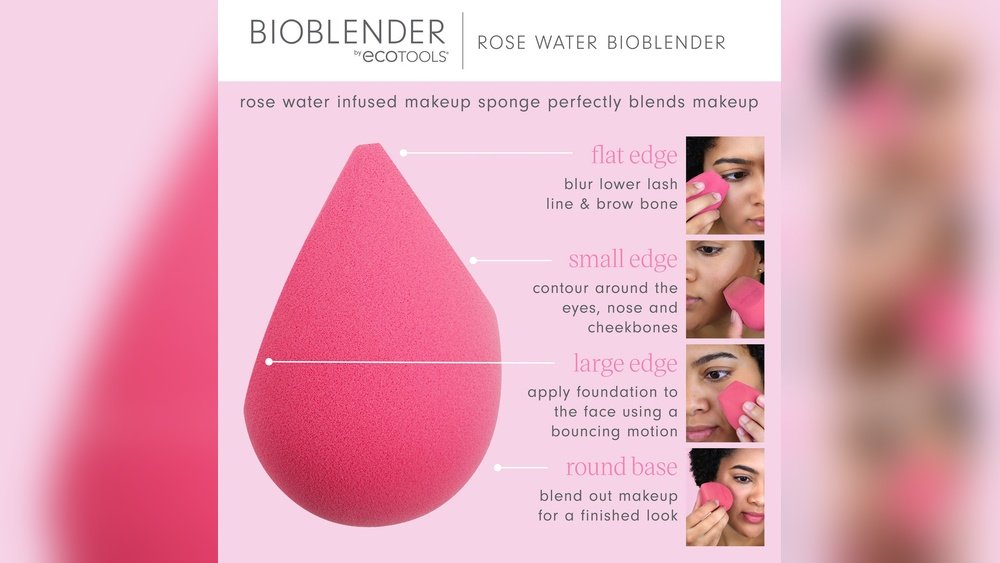
| Sponge Type | Best For | Shape |
|---|---|---|
| Classic egg-shaped | All-over blending | Round with pointy tip |
| Flat-edge sponge | Contouring, baking | Flat and angled sides |
| Mini sponge | Small areas (under eyes, nose) | Tiny, precise shape |
A high-quality sponge feels soft, bounces back when pressed, and doesn’t absorb too much product. Cheap sponges can be too hard, leading to streaks and wasted makeup.
Credit: www.youtube.com
Preparing Your Skin
Even the best sponge can’t hide dry or flaky skin. Prepping your face is a must. Cleanse to remove oils and dirt. Exfoliate gently to smooth any dry patches. Follow with a light moisturizer suited for your skin type. Wait a few minutes before applying makeup—this helps the base blend better and last longer.
If you have oily skin, try a mattifying primer. For dry skin, use a hydrating primer. These products create a smooth surface for your sponge to work its magic.
How To Wet And Use The Sponge
Many beginners use their sponge dry, but a damp sponge is crucial. Here’s how:
- Hold the sponge under running water until fully soaked.
- Squeeze out excess water. The sponge should feel damp, not dripping.
- Wrap in a clean towel and squeeze again to remove extra moisture.
A damp sponge expands and becomes softer, which is important for smooth blending. If the sponge is too wet, it can dilute your makeup. If too dry, it may absorb product and cause patchiness.

Credit: beautyblender.com
Step-by-step: Applying Foundation With A Sponge
Applying foundation is often the first makeup step. Here’s how to do it perfectly:
- Pump out foundation onto the back of your hand or a palette.
- Dip the rounded side of the damp sponge into the foundation.
- Dab foundation onto your face in small dots (forehead, cheeks, chin).
- Bounce the sponge gently over your skin. Use a tapping (stippling) motion, not swiping or dragging.
- Blend around the nose and eyes with the sponge’s pointy tip.
- Layer if needed for more coverage, repeating the tapping motion.
The tapping technique helps foundation melt into skin, creating a natural look. If you see streaks or marks, your sponge may be too dry or you may be dragging it.
Using A Sponge For Concealer
Concealer requires precision, especially under the eyes or on blemishes.
- Apply concealer in small dots on areas you want to brighten or cover.
- Use the pointed tip of the sponge to tap and blend.
- For dark circles, blend inwards toward the nose, then outward.
- For blemishes, tap gently until the concealer melts into the skin.
A common mistake is blending concealer too much, which removes coverage. Tap lightly until the edges disappear, but keep the coverage where you need it.
Applying Other Products With A Sponge
Makeup sponges are not just for foundation and concealer. You can use them for other products:
- Cream blush: Tap a small amount onto cheeks, then blend with the rounded side.
- Contour stick/cream: Apply stripes under cheekbones, then blend upward with the sponge.
- Liquid highlighter: Dot on cheekbones and blend with the tip.
Some people use sponges for setting powder. To do this, dip the flat edge into powder and press onto oily areas. This technique, called “baking,” sets makeup and controls shine.
Cleaning And Caring For Your Sponge
A dirty sponge can cause breakouts and spread bacteria. Clean your sponge after every use or at least once a week.
| Cleaning Method | How Often | Tips |
|---|---|---|
| Soap and water | Every use | Massage gently, rinse until water runs clear |
| Microwave sanitizing | Weekly | Wet sponge, heat in microwave-safe bowl for 1 minute |
| Special sponge cleanser | Weekly | Follow product instructions |
Replace your sponge every 1-3 months or if you see tears, stains, or a bad smell.

Credit: www.youtube.com
Common Mistakes To Avoid
Many people make small errors that reduce the quality of their makeup:
- Using a dry sponge (leads to streaks)
- Dragging or wiping instead of tapping
- Skipping skin prep
- Not cleaning the sponge regularly
- Using too much product (sponges use less than brushes!)
Try practicing your sponge technique before a big event to build confidence.
Pro Tips For A Flawless Finish
- For sheer coverage, use a very damp sponge and less foundation.
- For full coverage, use a less damp sponge and layer foundation.
- Use different sides for different products (foundation, blush, highlighter).
- Store your sponge in a clean, ventilated area—never in a closed bag while damp.
Advanced artists sometimes spray setting spray on the sponge before blending for longer-lasting makeup.
Frequently Asked Questions
How Often Should I Replace My Makeup Sponge?
You should replace your makeup sponge every 1-3 months, or sooner if you notice tears, stains, or a foul smell. A damaged sponge can harbor bacteria and affect your makeup application.
Can I Use A Makeup Sponge For Powder Products?
Yes, you can use a makeup sponge for powder. Use the flat side to press powder onto oily areas for a matte finish or to “bake” under the eyes.
What’s The Difference Between A Brush And A Sponge?
Brushes often give heavier coverage and can leave streaks if not used well. Sponges offer a more natural, airbrushed finish and are better for blending liquid and cream products.
How Do I Clean My Makeup Sponge?
Clean with mild soap and water, squeezing until clear. You can also use special cleansers or microwave sanitizing (wet sponge only). For a full guide, check sources like Healthline.
Should I Use A Sponge Wet Or Dry?
Always use your makeup sponge damp for best results. A dry sponge can absorb too much product and create streaks, while a damp sponge blends makeup smoothly.
Applying makeup with a sponge is a skill that gets better with practice. When you follow these steps, your makeup will look smoother, fresher, and last longer—whether you’re heading to work or out for a special night. With the right tools and techniques, you’ll see why so many makeup artists never go without their trusty sponge.